热线电话:0755-23712116
邮箱:contact@shuangyi-tech.com
地址:深圳市宝安区沙井街道后亭茅洲山工业园工业大厦全至科技创新园科创大厦2层2A
仿射变换和透视变换更直观的叫法可以叫做「平面变换」和「空间变换」或者「二维坐标变换」和「三维坐标变换」。一个是二维坐标(x,y),一个是三维坐标(x,y,z)。也就是:
仿射变换:


透视变换:


从另一个角度也能说明三维变换和二维变换的意思,仿射变换的方程组有6个未知数,所以要求解就需要找到3组映射点,三个点刚好确定一个平面。透视变换的方程组有8个未知数,所以要求解就需要找到4组映射点,四个点就刚好确定了一个三维空间。
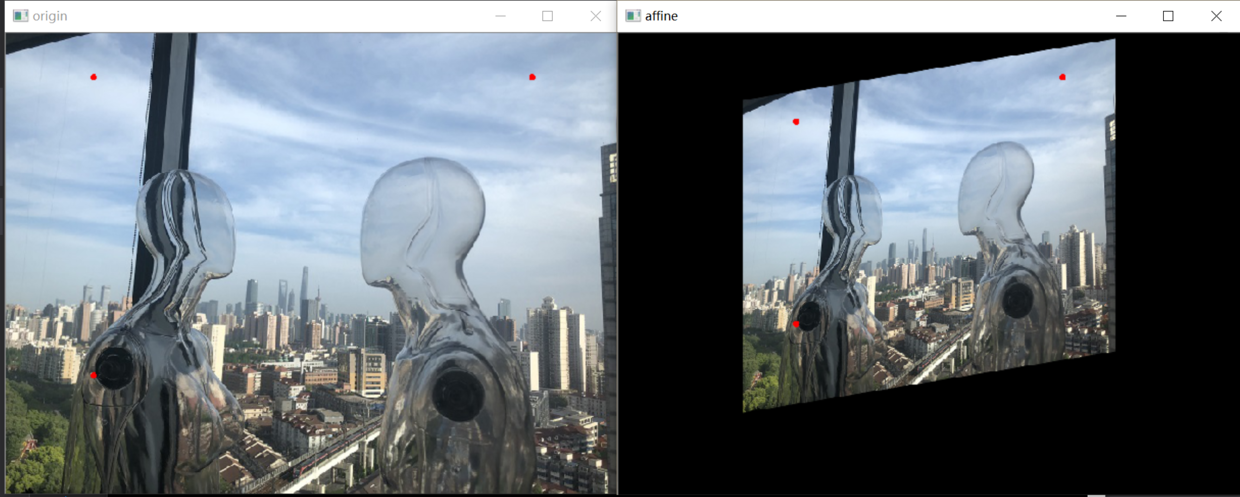
仿射变换和透视变换的数学原理也不需要深究,其计算方法为坐标向量和变换矩阵的乘积,换言之就是矩阵运算。在应用层面,放射变换是图像基于3个固定顶点的变换,如图1.1所示:

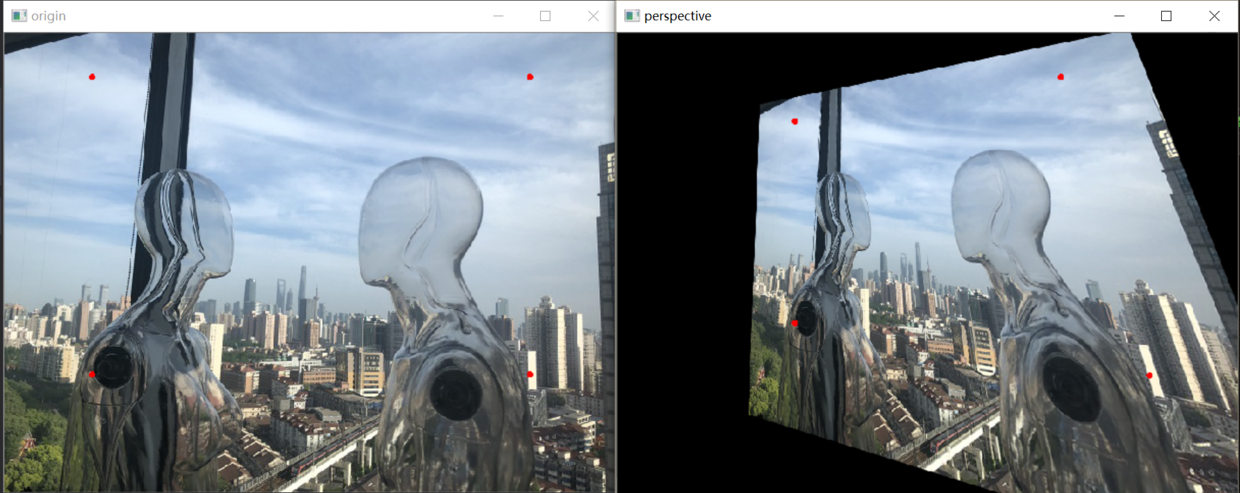
图中红点即为固定顶点,在变换先后固定顶点的像素值不变,图像整体则根据变换规则进行变换同理,透视变换是图像基于4个固定顶点的变换,如图1.2所示:

在OpenCV中,放射变换和透视变换均有封装好的函数,分别为:
void warpAffine(InputArray src, OutputArray dst, InputArray M, Size dsize, int flags=INTER_LINEAR, int borderMode=BORDER_CONSTANT, const Scalar& borderValue=Scalar())
与
void warpPerspective(InputArray src, OutputArray dst, InputArray M, Size dsize, int flags=INTER_LINEAR, int borderMode=BORDER_CONSTANT, const Scalar& borderValue=Scalar())
两种变换函数形式完全相同,因此以仿射变换为例:
void warpAffine(InputArray src, OutputArray dst, InputArray M, Size dsize, int flags=INTER_LINEAR, int borderMode=BORDER_CONSTANT, const Scalar& borderValue=Scalar())
参数InputArray src:输入变换前的图像;
参数OutputArray dst:输出变换后图像,需要初始化一个空矩阵用来保存结果,不用设定矩阵尺寸;
参数Size dsize:设置输出图像大小;
参数int flags=INTER_LINEAR:设置插值方式,默认方式为线性插值;
后两个参数不常用,在此不赘述。
关于生成变换矩阵InputArray M的函数getAffineTransform():
Mat getAffineTransform(const Point2f* src, const Point2f* dst)
参数const Point2f* src:原图的三个固定顶点
参数const Point2f* dst:目标图像的三个固定顶点
返回值:Mat型变换矩阵,可直接用于warpAffine()函数
注意,顶点数组长度超过3个,则会自动以前3个为变换顶点;数组可用Point2f[]或Point2f*表示
示例代码如下:
//读取原图
    Mat I = imread("..//img.jpg");
    //设置空矩阵用于保存目标图像
    Mat dst;
    //设置原图变换顶点
    Point2f AffinePoints0[3] = { Point2f(100, 50), Point2f(100, 390), Point2f(600, 50) };
    //设置目标图像变换顶点
    Point2f AffinePoints1[3] = { Point2f(200, 100), Point2f(200, 330), Point2f(500, 50) };
    //计算变换矩阵
    Mat Trans = getAffineTransform(AffinePoints0, AffinePoints1);
    //矩阵仿射变换
    warpAffine(I, dst, Trans, Size(I.cols, I.rows));
    //分别显示变换先后图像进行对比
    imshow("src", I);
    imshow("dst", dst);
    waitKey();
同理,透视变换与仿射变换函数类似:
void warpPerspective(InputArray src, OutputArray dst, InputArray M, Size dsize, int flags=INTER_LINEAR, int borderMode=BORDER_CONSTANT, const Scalar& borderValue=Scalar())
生成变换矩阵函数为:
Mat getPerspectiveTransform(const Point2f* src, const Point2f* dst)
注意透视变换顶点为4个。
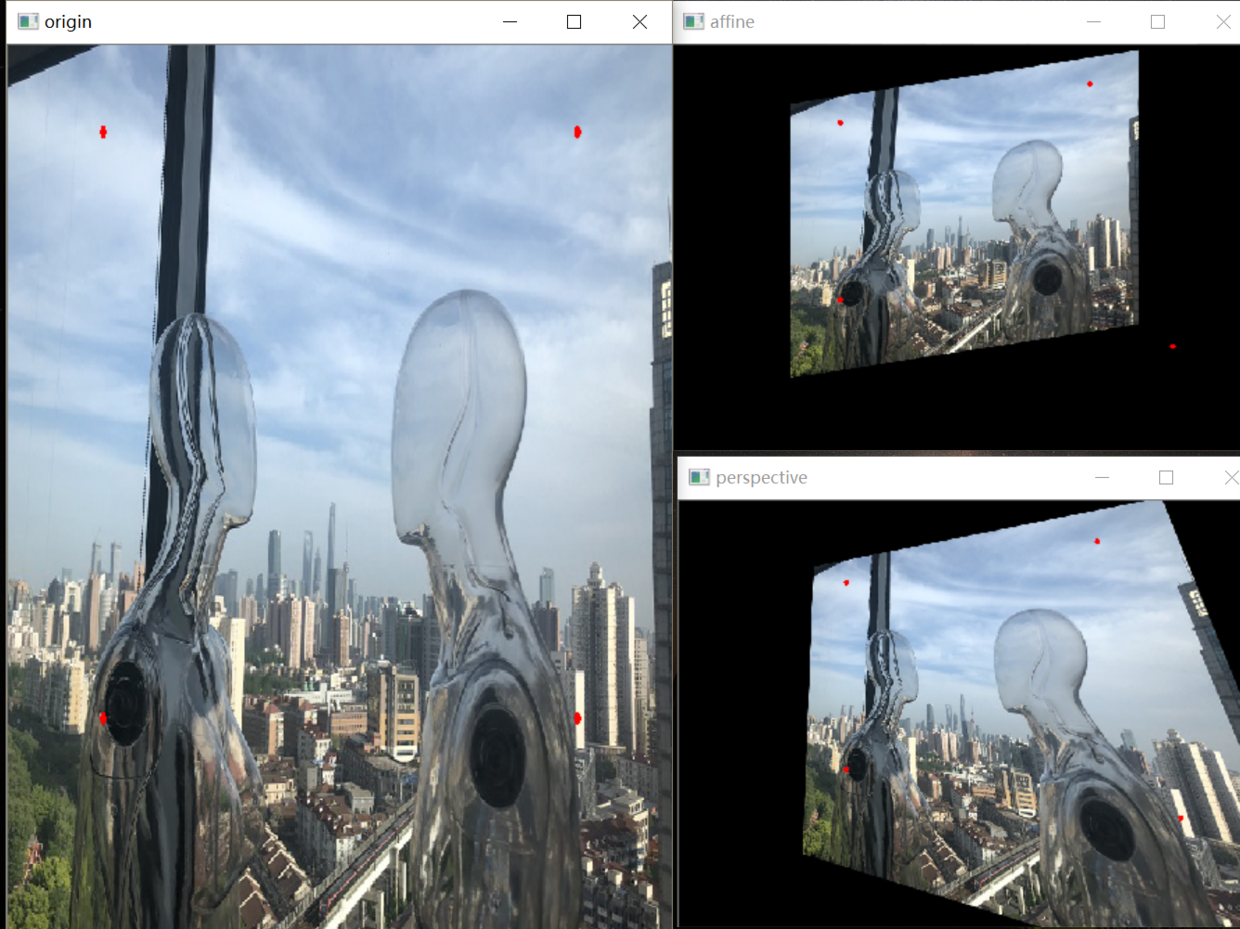
两种变换完整代码及结果比较:
#include <iostream>
#include <opencv.hpp>
using namespace std;
using namespace cv;

Mat AffineTrans(Mat src, Point2f* scrPoints, Point2f* dstPoints)
{
    Mat dst;
    Mat Trans = getAffineTransform(scrPoints, dstPoints);
    warpAffine(src, dst, Trans, Size(src.cols, src.rows), CV_INTER_CUBIC);
    return dst;
}

Mat PerspectiveTrans(Mat src, Point2f* scrPoints, Point2f* dstPoints)
{
    Mat dst;
    Mat Trans = getPerspectiveTransform(scrPoints, dstPoints);
    warpPerspective(src, dst, Trans, Size(src.cols, src.rows), CV_INTER_CUBIC);
    return dst;
}

void main()
{
    Mat I = imread("..//img.jpg");  //700*438
    Point2f AffinePoints0[4] = { Point2f(100, 50), Point2f(100, 390), Point2f(600, 50), Point2f(600, 390) };
    Point2f AffinePoints1[4] = { Point2f(200, 100), Point2f(200, 330), Point2f(500, 50), Point2f(600, 390) };
    Mat dst_affine = AffineTrans(I, AffinePoints0, AffinePoints1);
    Mat dst_perspective = PerspectiveTrans(I, AffinePoints0, AffinePoints1);
    for (int i = 0; i < 4; i++)
    {
        circle(I, AffinePoints0[i], 2, Scalar(0, 0, 255), 2);
        circle(dst_affine, AffinePoints1[i], 2, Scalar(0, 0, 255), 2);
        circle(dst_perspective, AffinePoints1[i], 2, Scalar(0, 0, 255), 2);
    }

    imshow("origin", I);
    imshow("affine", dst_affine);
    imshow("perspective", dst_perspective);
    waitKey();
}